Slider

I'm Obsessed With: Floral Embroidered Fashion

Tuesday, 8 August 2017

*Disclaimer: This post is in collaboration with BoomOutlet.com! If you use my 10% off discount code: "xarixlla" I do get a commission of 30% and a possibility of free products to try out for every 3 times my code is used. I don't get anything for clicking links/website views. *


So now that that's out of the way, hi!

I've recently been obsessed with anything embroidered with floral patterns, roses, blossom etc. Everywhere I turn, there's some sort of embroidered piece of fashion: backpacks, ankle boots, dresses. I thought as been as I'm working with BoomOutlet.com, I might as well show you some of my favourite embroidered pieces from their site. They do sell plenty of other gorgeous items, so go on over and have a browse (there's also some pretty cute makeup brushes that may look familiar to a lot of you, which would be perfect to use for flat-lay props if not makeup application). 

...

I'm gonna start off with this perfect Autumn/Winter jacket. 


It's a sleek, back jacket with large embroidered patches. It also comes in a khaki green colour. 


The detailed embroidery can also be seen on the back of the jacket. This would be a great piece to size up on and use as an oversized coat on top of a knitted jumper, some skinny jeans and your favourite boots. 


...


Now I wanna show you a few hoodies you can cosy up in when you have those lazy nights in on the sofa with a hot cuppa. 


These Golden Rose hoodies are probably my favourite out of all of the items in this post. When I think of embroidered fashion, red roses and pink blossom spring to mind; but these are gold roses. The gold roses really compliment the beige hoodie, but they're all equally as comfy looking. The roses just run down both sleeves. 


...


 This comfy hoodie has a simple design. The front of the hoodie is plain, and the main attraction takes place around the edge of the hood. 


This is available in black or cream.


...


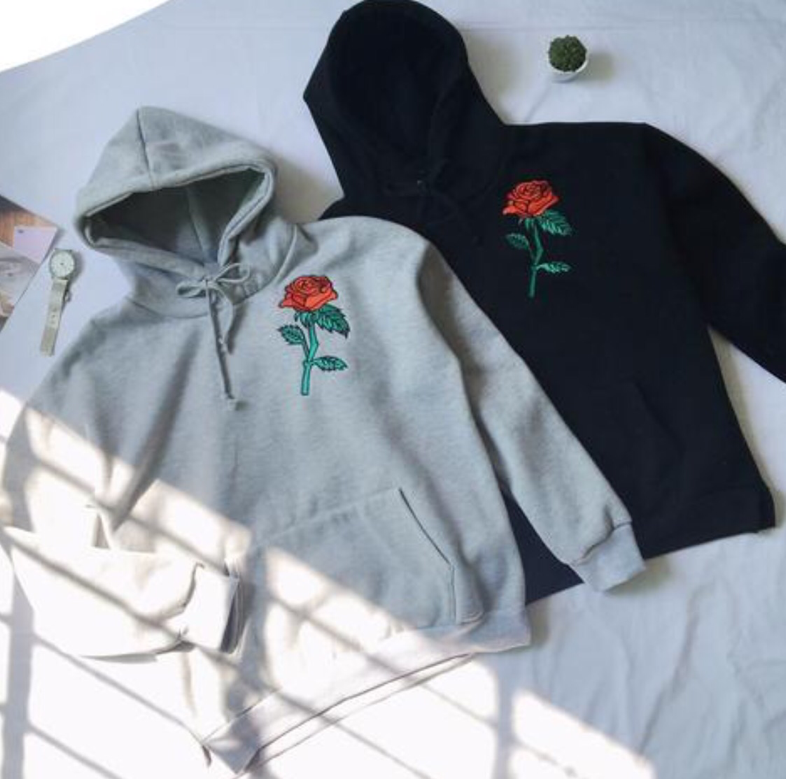
This hoodie also has a simple design. A single rose. Easy to throw on with a pair of pyjama shorts and some slippers. Nothing too fancy for getting ice-cream drunk in bed while you watch all the best Disney movies. 


...


This next item is definitely something your wardrobe needs this Autumn. 


Easily styled with a skirt or skinny jeans, it's a dainty knit with traditional roses and also comes in black!


...


This t-shirt goes to show that not ALL embroidered fashion has to be about flowers. 


A pretty little doodle-style design. Wear with a cardigan, jeans and a cute pair of flats. Also available in black! 


...


Most of the bags I've seen that have had embroidery on them have been faux leather handbags/clutches, or when it's been a backpack, it's been silk and covered in floral design. 


I thought these backpacks were a little more unique. The fabric is a canvas type fabric and the dainty roses are placed perfectly. This also comes in a black design too.


...


I just want to reiterate that this is an ad, it is a sponsored post, but all opinions are my own. I would never promote clothes I wouldn't wear myself! (I only get commission for purchases, I DO NOT get commission of any kind just for clicks). 

I hope you enjoyed scrolling through some of my favourite items at the moment, and if you do purchase anything from BoomOutlet.com, make sure you get your 10% off by using my special code: "xarixlla". All links are in pink font, so you can easily see where the products links are! 

I'll be back soon!


Sewing: How To Make a Bunny Ear Hair Scrunchie

Wednesday, 2 August 2017


Hi guys!


Today's post is going to be a little different, but it's something I've wanted to do for a while. You may know that I love to sew, crochet and do many other crafty things, so I thought I'd start doing a few posts here and there on my little makes. I wasn't sure how popular this kind of post would be, or whether I should make a separate blog if I was going to post this kind of thing, but after giving it a think, I decided that blogging is all about expressing yourself. And you all read my blog because you either like what I post, care for my opinion, or enjoy seeing what I get up to. And sewing happens to be a big part of my life. I'm still going to do beauty/lifestyle posts, but I want to try this style of post for myself. It would just be a huge plus if you all enjoyed it. So I'll get into it! 

Today I'm going to show you how to make this style of pretty, pink hair scrunchie (I usually just call it the Bunny Ear Scrunchie).


The Scrunchie (Piece A)

1. Piece A will be the main part of the scrunchie. Here are your measurements:


I usually start at the edge of the fabric, this way there's less waste, and the rough edges won't matter. Mark 3.5 inches width, and do this several times along the fabric to ensure that you get an nice straight line. Do this until you reach 16 inches length ways. Join up your marks, and cut out Piece A. 


Now you need to fold Piece A in half along the short edge, so that the patterned side (or side you want to be showing when your scrunchie is done) is on the inside. Use 3-4 pins to hold this in place (I use Hemline Pearl Head Pins). 


You want to leave roughly 2 inches either end and do NOT sew them, leave the ends open. You'll see why later on. Once you've sewn along Piece A, turn it out so that the pattern is facing outward. 


2. Next you need your elastic. The elastic needs to be roughly 9mm width, and it needs to be between 6-7 inches long. 


Threading the elastic through Piece A is the next step. To make this easier I usually attach one end of the elastic to one end of Piece A using a safety pin, this prevents the elastic from pinging out of the other end. You can also put a safety pin on the other end of the elastic so you can grab onto that when threading your elastic.


 Once you've got both ends visible, you need to overlap them and run a stitch over them to secure them in place. Do this a few times to make sure its nice and strong. 


3. This part can look tricky, and can be quite fiddly if you've not done it before so be patient and take your time. This is where the two ends on Piece A that weren't sewn come in. You need to grab each end and put them back to back (patterned sides touching) ensuring they aren't twisted. 


Go ahead and sew the edges together. Once done, the scrunchie should fall into the right shape. 

I've popped a pin through this to hold it together.

All that's left to do for this part is to sew along the scrunchie to close the hole. It will then look like this.


It doesn't matter that you can see the stitching, as this is where you'll tie on the ears. And here is the scrunchie!


The Ears (Pieces B+C)

1. First of all you're going to need to make a template. You'll need a piece of card, A4 size will be plenty big enough. Or you could use some cardboard from something like a shoe box. Anything will do as long as it's fairly stiff. I've written the rough measurements on my template so you can get a rough idea of how big it needs to be, but it doesn't have to be exact. 


Its a case of trial and error. You may want to practise the template sizing by doing a few good ones and testing them on some scrap fabric. The easiest way to do it, and how I make mine, is to fold the piece of card in half, just drawing on the half of the shape. Then while it's still folded, cut it out and it will be symmetrical. I've folded my template in half to show you what I mean. Just draw that half on the card, and once you cut it out you'll have the full template. 


2. Once you've got your template sorted, you'll want to fold your piece of fabric in half. Then place you template on top and trace around the edge, but leave roughly half an inch to allow for the seams. 


You can now take off your template. At this point you're ready to cut out pieces B+C, but to make this easier you can use some pins to hold the two together neatly while you cut the pieces out. Leave the pins in when you're done as they'll help to keep the pieces in line when you sew them together


3. So, now you can sew carefully around the edges, following the curves and making sure you get those pointed tips. However, you need to leave a gap along one of the straight edges because this is how you're going to turn your work out. 


Before turning your work out, you need to trim any excess fabric from around the outside of the seem. This gives the seams a neater finish and they'll fold a lot nicer. 


4. Once you've completed step 3, you'll see that there's an open seam again. A bit like how you did on the scrunchie, you just need to sew along that edge to close it. The fabric should fold nicely into itself. And then it'll look like this.


5. TIE THE EARS ONTO YOUR SCRUNCHIE!

Just tie the ears around your scrunchie so that they hide the stitching, and fiddle around with them until they're in the perfect position. And then it's done! 


I hope you enjoyed this post! If you don't fancy making these yourself, you can head over to my facebook page where I sell all the accessories I make. There's anything from hair scrunchies, to chokers, to crocheted matching baby sets. I also make seasonal hair scrunchies, my christmas themed ones are my best seller. And this year I'm adding Halloween scrunchies to the range!

So head over to my page for a browse, give it a like and invite your friends. Keep an eye out for more sewing tutorials on this space!

Thank you for reading, and let me know if you decide to have a go at making these. If you do, tweet me the pics (@peachmilkshakes).


CopyRight © | Theme Designed By Hello Manhattan